Svelte is a compiler for creating reactive web applications. A reactive webapp reacts to data changes - it uses data when the state changes there is a reflection of that change in the browser. It bundles your JavaScript code into a single file for production without any extra scripts or libraries, resulting in a faster website!
I’ve broken down this introduction into 8 pieces:
- Step 1: Create a template
- Step 2: Edit the template
- Step 3: Understanding components
- Step 4: Understanding
main.js - Step 5: Bundling
- Step 6: Make it reactive
- Step 7: Creating an input
- Step 8: Two way binding
Step 1: Create a Svelte Template
We’ll first install the degit library which will allow us to clone a Svelte template, with some additional cool features you don’t get from plain old git.
npm install -g degitNow you can navigate to the directory you want to create your project in and type
degit sveltejs/template svelteprojWhich can be read as clone the template repository from sveltejs and put that in a folder locally called svelteproj
This gives us the starter file directory:
|– public where the output production code is put to deploy
|—- favicon.png
|—- global.css
|—- index.html
|– scripts
|—- setupTypeScript.js
|– src - write all our source code
|—-App.svelte the svelte root component of the app
|—-main.js the main file to kickstart the app
|– .gitignore don’t include build file
|– package.json list dependencies and scripts
|– README.md help file
|– rollup.config.js watches, configures, and bundles code
Install the packages in our package.json file by running npm install. This adds a new folder to our directory, node_modules and a package-lock.json file:
|– node_modules
|– public
|—- favicon.png
|—- global.css
|—- index.html
|– scripts
|—- setupTypeScript.js
|– src
|—-App.svelte
|—-main.js
|– .gitignore
|– package.json
|– package-lock.json
|– README.md
|– rollup.config.js
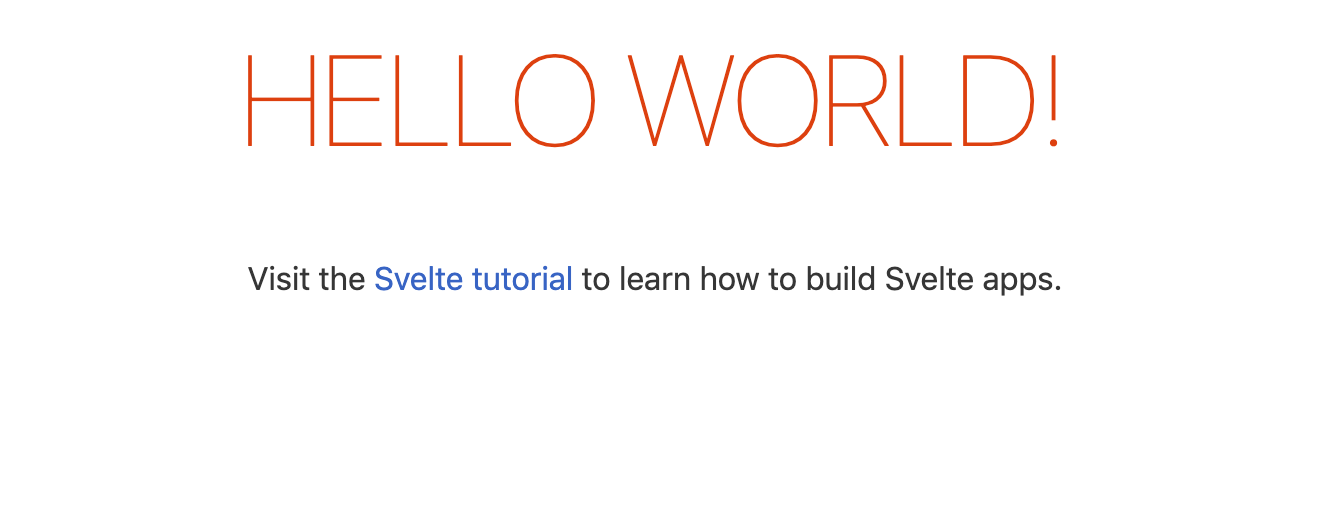
Now we can look at the template locally by running npm run dev. This will prompt you to open your local host and see the webpage below:
  Your application is ready~! 🚀

  - Local:      http://localhost:5000
  - Network:    Add `--host` to expose

────────────────── LOGS ──────────────────
This is the content of our app, being driven within App.svelte:
<script>
    export let name;
</script>

<main>
    <h1>Hello {name}!</h1>
    <p>Visit the
    <a href="https://svelte.dev/tutorial">Svelte tutorial</a>
    to learn how to build Svelte apps.
    </p>
</main>

<style>
    main {
        text-align: center;
        padding: 1em;
        max-width: 240px;
        margin: 0 auto;
    }

    h1 {
        color: #ff3e00;
        text-transform: uppercase;
        font-size: 4em;
        font-weight: 100;
    }

    @media (min-width: 640px) {
        main {
            max-width: none;
        }
    }
</style>
Step 2: Edit the Template
If you change any of this code and save it, the changes will be rendered automatically! Let’s try this by removing:
<p>Visit the
<a href="https://svelte.dev/tutorial">Svelte tutorial</a>
to learn how to build Svelte apps.
</p>
and adding
<p><My single page webapp</p>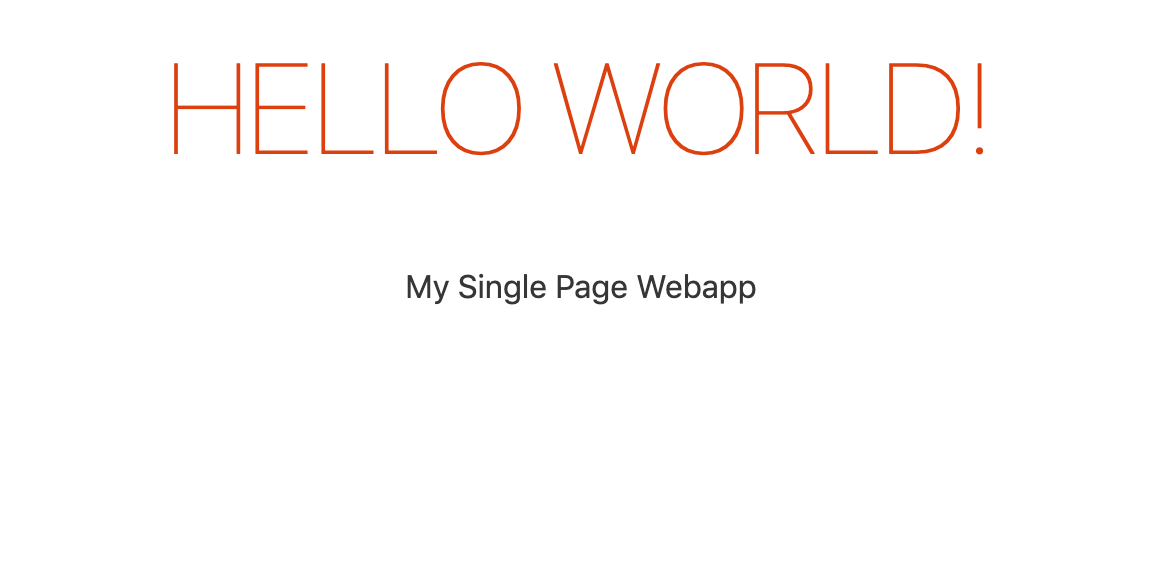
Step 3: Understanding Components
We write most of our code in the src folder, and this is where we create our app components. Think of components as lego blocks that Svelte will stack together into the DOM to create your website. All components must have the extension .svelte. Let’s look at the App.svelte component and break it down into it’s three elements:
script
The script is the component logic, here we are creating a variable called name
<script>
    export let name;
</script>
html template
This is the html to be injected into the DOM
<main>
    <h1>Hello {name}!</h1>
    <p><My single page webapp</p>
</main>stylehow to style the component that will be injected.
<style>
    main {
        text-align: center;
        padding: 1em;
        max-width: 240px;
        margin: 0 auto;
    }

    h1 {
        color: #ff3e00;
        text-transform: uppercase;
        font-size: 4em;
        font-weight: 100;
    }

    @media (min-width: 640px) {
        main {
            max-width: none;
        }
    }
</style>
Step 4: Understanding main.js
This is the file that kickstarts the app and sets everything up for us:
import App from './App.svelte';

const app = new App({
    target: document.body,
    props: {
        name: 'world'
    }
});

export default app;
We import the code from App.svelte, so that we can create a single instance of the component called app.
In this specific instance called app, we specify the target (where we want to put the html), and we’re putting it in the document.body.
If you navigate to public/html you’ll see:
<!DOCTYPE html>
<html lang="en">
<head>
    <meta charset='utf-8'>
    <meta name='viewport' content='width=device-width,initial-scale=1'>

    <title>Svelte app</title>

    <link rel='icon' type='image/png' href='/favicon.png'>
    <link rel='stylesheet' href='/global.css'>
    <link rel='stylesheet' href='/build/bundle.css'>

    <script defer src='/build/bundle.js'></script>
</head>

<body> #<<
</body> #<<
</html>
By assigning the target to document.body we’re saying put our code inside those body tags. This is generally where component code will go but you can use whatever selectors you like!
In the second part of app we use props to pass data into the component. In the script portion of App.svelte we created a variable called name so that we can print Hello {name} in the html of the component. By assinging world to the name property, the app component will display Hello world.
Step 5: Bundling
This example has a single component but in reality we nest components and stack them together. All the scripts, styles and html from all our components are bundled together inside public/build and if we navigate back to our index.html we see that these bundled scripts are referenced inside the head of our page.
<link rel='stylesheet' href='/build/bundle.css'>
<script defer src='/build/bundle.js'></script>
Step 6: Make it reactive
In our script we leverage the variable name but let’s modify that script a bit:
<script>
    export let name;
</script>
Rather than export the name as a prop, we can give it a string value:
<script>
    let name = Maya;
</script>
To demonstrate the reactivity of the page, we can create a button element in our html with an on click handler that will change the name displayed when clicked
<main>
    <h1>Hello {name}!</h1>
    <p>My Single Page Webapp</p>
    <button on:click={handleClick}>update name</button>
</main>
Then we need to add the handleClick function to our script code above:
<script>
    let name = 'Maya';

    const handleClick = () => {
    name = 'Gans'
    }
</script>
on:click={handleClick} is Svelte syntax, which makes it really easy to react to and change dynamic data like our click event here. What happens when we build our project is it runs accross all our components, takes the Svelte syntax, and compules it all into vanialla JS. This compiled code can be seen in build/bundle.js [it’s 459 lines for this one little component - but all the hard work is done for us!]
Step 7: Creating an input (your own name)
Let’s finish off this introduction by creating an input so that the user can display their own name on the page, and rather than need to click a button it will dynamically update with typing.
Just by adding an input element we see we can create a text field:
<main>
    <h1>Hello {name}!</h1>
    <p>My Single Page Webapp</p>
    <button on:click={handleClick}>update name</button>
    <input type="text">
</main>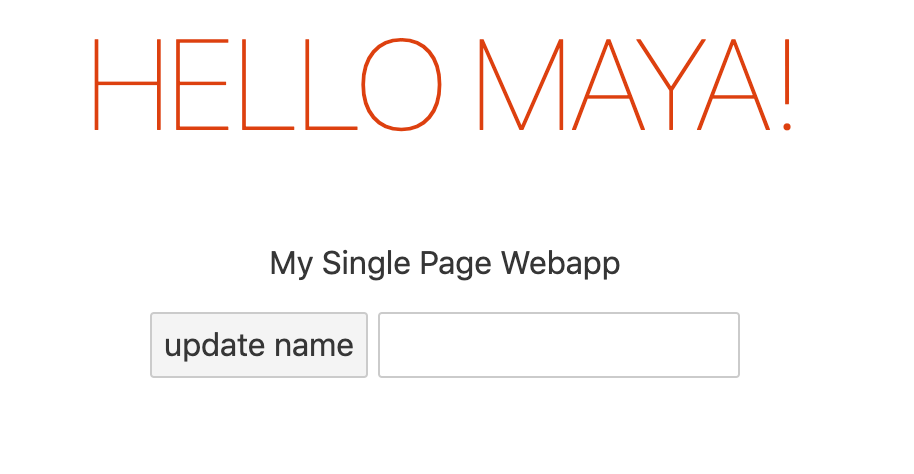
Just as we created the handleClick even on click we want to create another input event tracker here that updates whenever the user types. We’ll call this function handleInput
<input type="text" on:input={handleInput}>Note that we are not invoking the function handleInput() as that would call the function when the page is loaded. Rather we want to call this function as a reference, only being called when the event occurs.
Now let’s write the function logic. We want handleInput to take the value of the input and assign it to name. We can do this by giving the function the event parameter as an argument e which lets us access the target element (the input).
<script>
    let name = 'Maya';

    const handleClick = () => {
      name = 'Gans'
    }

    const handleInput = (e) => {
     name = e.target.value
    }
</script>
Now, everytime the user inputs text it is going to run the function and update the name in real time!
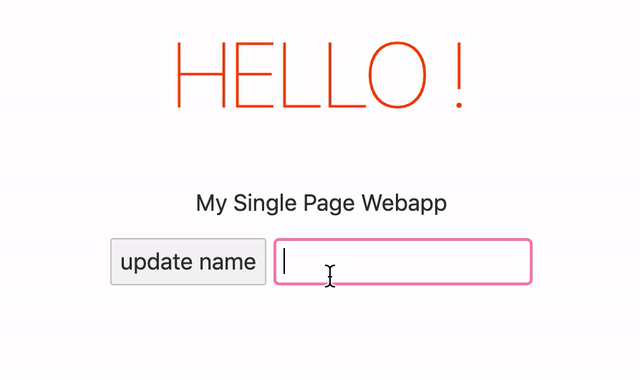
…This is really cool but the binding is currently only one way. If we press the button and change name to Gans, the input text will not change to Gans (it remains Maya as pictured above)

Step 8: Two way binding
We can add a value property to our input to set it to the name variable so whenever name changes, the input value will be updated to reflect that
<input type="text" on:input={handleInput} value={name}>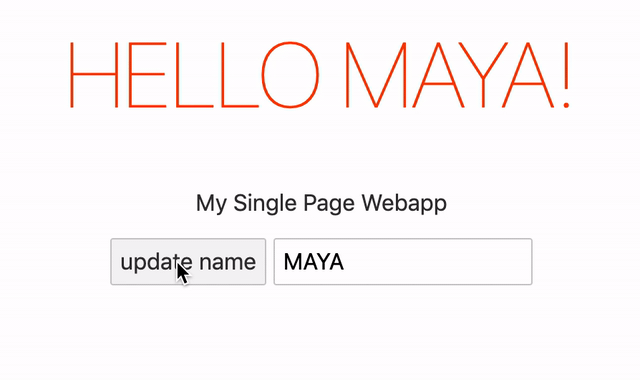
A Shortcut
Rather than writing the input element as we have, there is a Svelte shortcut for two way binding: we can use bind element to name.
<input type="text" bind:value={name}>And there you have it! A first contact introduction to Svelte. This was inspired by the The Net Ninja’s Tutorials which you can follow along with here. I’ve also included this code in a repo here.
I put these skills to the test (and more!) by making a website to keep track of the Phish broadcasts entitled Dinner and a Movie. You can check out the repo here